 Web Development remains to be at the top of every aspiring techies bucket list. Web development, in its essence, is the practice of developing and maintaining web pages and web applications. Now that you have landed here, you are either an aspiring web developer or an experienced one, looking to sharpen his skill-set. So, let’s take a dive in to one of the most trending web development frameworks today – Django.
So, what makes this framework so awesome? Why do people use it all? One of the highlights of Django is that it is built on Python, which is an incredibly robust and dynamic programming language. Due to this, Django delivers high-quality and transparent code writing which is an important aspect of this framework. It offers various other features like an Automatic Administration Interface or the Object Relational Mapping (ORM). Well, that’s enough of tech jargons for today, now let’s look at what they really mean.
What is Django?
Django is an open-source web development framework named after one of the greatest musician of the 21st century – Django Reinhardt
At the heart of it, Django has one very simple principle – Don’t Repeat Yourself. The principle is all about keeping the code non-repeating and simple which makes it more readable.
Why Choose Django?
Let’s take a look at few of the features that makes this framework an absolute no-brainer for web developers:
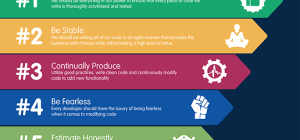
Fast: Django enables rapid development with a clean and pragmatic design. It is incredibly fast, free and an open source framework which helps the developers to complete their app as fast as possible. Django takes care of much of the hassle of Web development without needing to reinvent the wheel. This idea of code reusability is essential for any web developer.
Tons of Packages:The set of components and libraries provided by Django will help you speed-up the entire web development process. You don’t need to download it separately as Django installs all the libraries, packages and other such dependencies to handle common web development tasks. User Authentication, Site Maps and Content Administration, and many more are also taken care by Django
Secure:Django is built on Python, due to which, Django also reaps the benefit of the widely active Python web community. It helps the developers to avoid many common security mistakes, such as cross-site scripting, SQL injection, clickjacking and CSRF. Django also offers a user management system which allows you to manage users better.
Scalable:With the way technology is evolving, writing scalable codes and executing them is important. Django codes are highly scalable. Many high value websites like Instagram and Disqus uses Django for it’s back-end work. Django provides you with a proper framework to grow your website and add more functionalities.
Versatile– Django is used to build all sorts of things – from content management systems to social networks to scientific computing platforms. Therefore, Django is extremely versatile in all fields.
Django Architecture
Django follows a MVC- MVT architecture
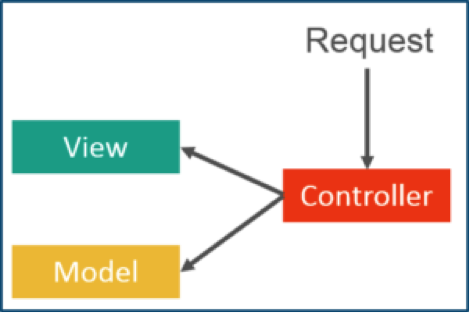
MVC stands forModel View Controller. It is used for developing the web publications, where we break the code into various segments. Here we have 3 segments, model view and a controller.
Model– This is basically the back-end where you define your database. Model is used for storing and maintaining your data.
Views– View is all about the presentation, whatever the user can see is referred to as View and it is not at all aware of the backend. In Django templates, views are in html.
Controller– Controller can be considered as a mediator. It is a business logic which interacts with the model and the view.
Now that we have cleared the air around MVC, let’s take a look at what MVT really means.
MVT stands forModel View Template. In MVT, every user interface has a pre-defined template. Let’s take a look at an example to understand better, imagine that you want to write multiple static HTML forms like Greetings user1, Greetings user2 and so on. With template, you will be having only one file that prints hello along with the variable name. Now this variable will be substituted in that template using some logic. That’s the beauty of templates, code reusability is utilized to the maximum here!
Now this brings us to question, where is the controller?
In the case of MVT, Django has an inbuilt feature of taking care of the Controller part.
With the architecture understood, let’s understand how Django really works.
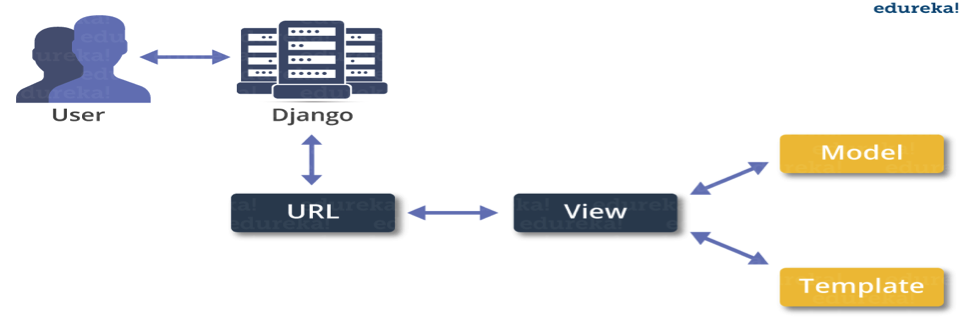
In the above image, template is your front end which will interact with the view and the model will be used as a back end. Then view will access both the model and the templates and maps it to a URL. After that, Django plays the role of controller and serves it to the user.
Sounds simple enough, right? So, let’s get started with installing Django and developing apps.
Django Installation
As mentioned earlier, Django is a Python web framework. To install Python on your system, go tohttps://python.org/downloads/.
Here, you will find a download button to download the latest version of Python. Download the installer and run it.
After installation, don’t forget to check that Python version matches the version you installed. Do this by opening the command prompt and executing:
Python –version
To install Django, you also need to understand the concept of pip which a package manager for Python. It makes installing and uninstalling all the packages of Python (Django included) much simpler. For simplicity, let’s use pip to install Python packages.
To install pip on your system, go tohttps://pip.pypa.io/en/latest/installing/ and follow theInstallingwithget-pip.pyinstructions.
Install virtualenv and virtualenvwrapper
virtualenvandvirtualenvwrapper are packages that provide a dedicated environment for all Django project you create. This is not mandatory but considered as a best practice and will save you time in the future. Simply type:
pip install virtualenvwrapper-win
Then you can create a virtual environment for all your projects like this:
mkvirtualenv project1
Install Django
Django can be installed efficiently usingpipcommands within your VM. It is that simple!
In the command prompt, execute this command and ensure your VM is active, and execute the following command:
pip install django
This command will download and install all the latest Django packages. With this you are ready to get started with your very own web apps development.
Excited? You should be.
Build Your First Web Application in Django
We have reached this far, let’s not waste any more time and get right to creating web apps. To do this, first we need to create a project. Enter in the directory where you want to create your project and then enter the following command:
django-admin startproject myproject
Your project is created! Now let’s discuss the list of directories that you have found:
manage.py– It is a command-line utility that lets you interact with this Django project in various ways.
urls.py– This is the main controller which does the job of mapping to your website.
init.py– Init instructs the python that this is to be treated like a python package.
myproject/– It is the actual Python package for your project. It can used to import anything that you need to build your application
wsgi.py– It serves as an entry point for WSGI compatible web servers.
settings.py– This file which is used for managing all the settings of your project.
Note that to create your application, make sure you are in the same directory as manage.py and then type the below command:
python manage.py startapp webapp
Now if we look at the ‘webapp’ directory, we have some extra things from the original project1. It includes model, test which are related to your backend databases.
Next in learning Django, you need to import your application inside your project settings manually. For that, open your myproject/settings.py and add your app:
| 1 2 3 4 5 6 7 8 | INSTALLED_APPS = ( ‘webapp’, ‘django.contrib.admin’, ‘django.contrib.auth’, ‘django.contrib.contenttypes’, ‘django.contrib.sessions’, ‘django.contrib.messages’, ‘django.contrib.staticfiles’, |
After installing the app, we need to create a view. Open your webapp/views.py and put the below code in it:
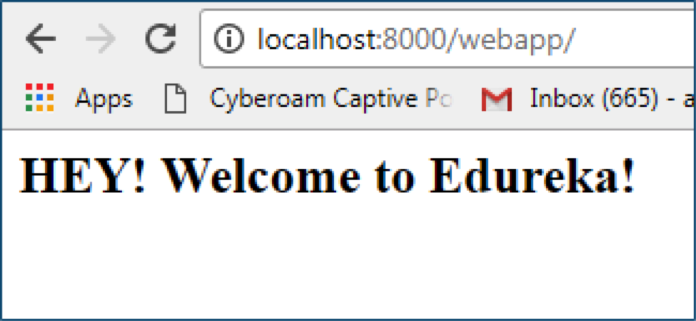
| 1 2 3 4 | from django.http import HttpResponse def index(request): return HttpResponse(“<H2>HEY! Welcome to Edureka! </H2>”) |
In the above code, I have created a view which returns httpResponse. Now we need to map this view to a URL. We need a URLconf in our application. So, let’s create a new python file “urls.py” inside our webapp. In webapp/urls.py include the following code:
| 1 2 3 4 | from django.conf.urls import url from . import views urlpatterns = [ url(r’^$’, views.index, name=’index’), |
In the above code, I have referenced a view which will return index (defined in views.py file). The url pattern is in regular format where ^ stands for beginning of the string and $ stands for the end.
The next step is to point the root URLconf at the webapp.urls module. Write the following lines of code in your myproject/urls.py file:
| 1 2 3 4 5 6 | from django.conf.urls import include, url from django.contrib import admin urlpatterns = [ url(r’^admin/’, include(admin.site.urls)), url(r’^webapp/’, include(‘webapp.urls’)), ] |
In the above code, I have added my webapp and included the webapp.urls. Now don’t forget to import django.conf.urls.include and insert an include() in the urlpatterns list. The include() function allows referencing other URLconfs.
That’s enough of coding! Let’s start the server and see what happens. To start the server, type the below command:
python manage.py startapp webapp
After running the server, go tohttp://localhost:8000/webapp/in your browser, and you should see the text “HEY! Welcome to Edureka!”, which you defined in your index view.
Hurray! We have successfully created a basic Web App. Build on your knowledge gained through this tutorial and learn Django here.