Tile over tile implies precisely what it says. Be that as it may, for this situation, you will sandwich a layer of brilliant warming mats between the old and the new tile. Tile over tile is a simple method to maintain a strategic distance from the chaos related to tearing up the old restroom floor yet requires intensive arranging.
Diversion:
Before you introduce a brilliant warmth tangle over the old restroom tile and put in new tile on the tangle, you should check the floor for avoidance. This is the greatest sum the floor can move under the expected load (you). Earthenware tile is hard and will break or unstick if the surface curves under the heap. Here’s a straightforward test:
Remain amidst the lavatory floor and bounce all over. In the event that the floor moves it has a diversion issue and isn’t a decent contender for tile over tile establishment until the point that you fortify the sub-floor.
Maintain a strategic distance from That Sinking Feeling:
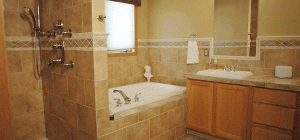
Since you’re tiling over tile, you should design ahead of time to abstain from making the vanity, latrine and tub seem as though they’re “sinking” into the new floor.
One approach to shield the lavatory apparatuses from turning gulped upward by the new floor is to evacuate the baseboard and reinstall it over the new tile. Even better, for what reason not purchase new baseboard tile as well?
To make up for roughly 1/2″ of extra floor stature, anticipate changing the length of the door(s) and potentially introducing another limit.
Arrangement:
Expel or re-connect broken tile pieces. In the event that you evacuate them, hold up until the point when the floor has been sanded and altogether vacuumed before you fill the spaces with mortar.
On the off chance that any of the tiles have split more extensive than 1/8″, you ought to think about a break disengagement film. This film is a move on an item that you apply to the old tile. The layer enables the new floor to move autonomously of the old.
Next, sand the old tile so the mortar has a decent holding surface. A belt sander would guarantee a steady holding surface.
If you don’t mind ensure you wear a face veil and security glasses while sanding. The tiles may have been let go with the harmful lead coat.
In the wake of sanding, vacuum the tile and wipe down with a general use cleaner. Give careful consideration to the zones untouched by the sander.
Establishment:
Reveal the mats pre-assembled to your details by the producer. Some brilliant frameworks, like Quickmat, are self-cement and require no mortar to secure them to the old tile floor.
On the off chance that your home has just a single washroom, cover the warming mats amid unavoidable interferences with plywood or overwhelming cardboard.
All through the establishment procedure, utilize an advanced ohm meter to check the protection of the warming mats. This will enable you to screen the mats for short circuits.
Have your circuit tester associate the warming mats to the power source and introduce the indoor regulator. Contingent upon the nearby electrical assessment methodology, you may need to hold up until the point that the activity is investigated before you begin laying tile.
Trowel out the mortar over the mats. A few producers suggest latex-altered or epoxy-changed mortar and grout rather than water-based multi-reason cement. Mortar beds thicker than 3/8 inch should work fine for most frameworks; they simply take somewhat longer to warm up.
Since you won’t cover the whole floor with warming mats(under the latrine), ensure the mortar in these regions is level with the mortar covering the warming mats.
This may sound self-evident. However, don’t slam the trowel into the tangle to expel overabundance mortar from the trowel. This could disjoin the warming wire.
At long last, you can introduce the new tile and baseboard.
Fire It Up!
Your new brilliant warmed washroom floor looks delightful and you can hardly wait to get warm feet. Proceed, yet just for 10 minutes. Try not to put the framework into full task until the point when the mortar is completely cured. This can take up to a month.
Contributed byhttp://homeokatu.com/


![Are You a Secret Hoarder? [Infographic]](https://lerablog.org/wp-content/plugins/wp-thumbie/timthumb.php?src=http://lerablog.org/wp-content/uploads/2014/11/Nation-of-Clutter-IG-v21.png&w=300&h=140&zc=1)