 ATV riding is becoming increasingly popular, and with that comes an ever-expanding market for ATV graphics kits. With all the options available, it is overwhelming for beginners to pick the right one. A comprehensive guide to choosing graphics kits comes in handy when starting.
Types of Graphics Kits
When choosing graphics kits for ATVs, there are several types to consider, including decals and full graphics kits.
- Decal Graphics Kits. These decals feature colorful designs and eye-catching logos that easily attach to an ATV frame or body panel without special tools or hardware. The adhesive backing makes applying the decal simple and hassle-free. Decals are a great option for those who want to add style to their ride but want to commit to something other than a more permanent graphic kit solution.
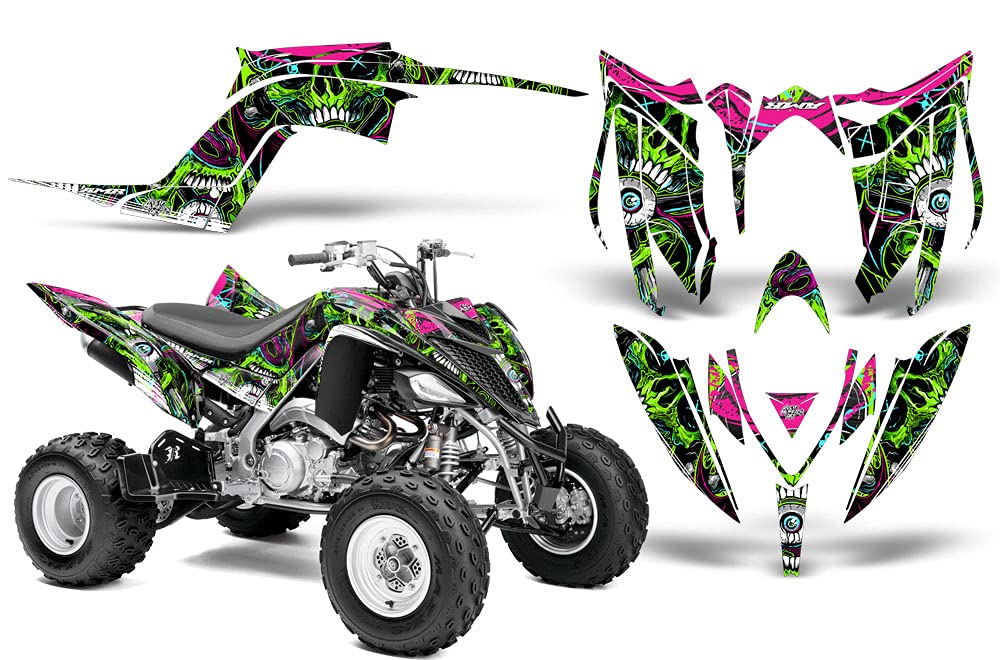
- Full Graphics Kits. These graphics kits provide maximum coverage with fewer pieces than individual decals, allowing individuals to create a unique look with custom color schemes and design ideas. Full graphics kits typically consist of a contour cut vinyl, printed backgrounds, and detailed accessories such as panels with printed images or textured elements like carbon fiber or mud flaps.
- Decal Graphics. These are stickers or pieces of vinyl that adhere directly to the plastic surfaces of an ATV. They come in all shapes, sizes, and colors. Some even feature designs with logos and other artwork. This type of graphic kit is relatively inexpensive compared to other types. Still, it may only last for a while because the adhesive on decals may eventually wear.
- Fender Graphic Kits. Fender graphic kits cover only the front and rear fenders of an ATV but can still help make a big visual impact when installed correctly. These graphics are typically made from high-quality vinyl material that is waterproof and fade-resistant, making them ideal for use in harsh environments or off-road racing applications where other graphics may not hold up so well over time.
- Partial Graphics Kits. Partial graphics kits only cover certain sections of an ATV, such as the hood or fenders. They are significantly cheaper than full-body graphic kits, allowing people to customize their ride without breaking the bank. However, because they only cover part of an ATV’s body rather than all sides in one go, they require more time and effort to install correctly. Plus, they offer less coverage than full-body graphic kits.
Factors to Consider Before Buying
Several important factors must be considered if an individual has been considering buying a graphics kit for their ATV.
- Design. The design of the graphics kit will be one of the most defining aspects of its overall look. Choose something that reflects your personality. Find kits from bold and daring patterns to subtle and stylish designs.
- Durability. The materials should be strong enough to stand up against harsh conditions like mud and dust. Consider how thick the decals are and what adhesive protects against peeling or fading over time.
- Cost. While having an eye-catching design is important, individuals don’t want to break the bank to get it done. Shop online and compare prices among different vendors to find something within the budget that still looks great.
- Installation Process. Different graphics kits have different installation processes. Choose the one that will be easy to handle. If that’s not possible, research local professionals who can do it at a reasonable price. Also, remember whether the kit comes with instructions or other tools needed to help make installation easier.
- Compatibility. Not all graphics kits are compatible with every type of ATV. Always double-check that the kit is suitable before ordering it online or purchasing it. Try reaching out directly to customer service representatives from each company to share the models they offer products for to ensure everything works out correctly.
Installation Tips
Here are some tips to remember to get the most out of graphics kit installation. First, decide on the type of graphics kit. Many options include full-body wraps, single-color decals, and textured finishes like carbon fiber and brushed aluminum. Spend time researching each option and comparing prices before making a final decision. Measure the ATV carefully to know what size graphics kit is needed.
Next, prepare the surface area that will be covered by the graphics kit thoroughly before installation. This means cleaning it with a mild detergent and removing any dirt or debris that could affect adhesion once the decal is applied. Allow this area to dry completely before proceeding with the installation.
When applying the decal itself, don’t rush, as this could result in mistakes or damage to both the decal and ATV’s surface. It’s also helpful if someone assists during the application. Hence, they secure areas where extra pressure is needed or hold onto an edge while smoothing out bubbles using a squeegee or plastic card.
Finally, after allowing 24-48 hours for curing time (again, check manufacturer guidelines), use a sealant or wax product specifically designed for vinyl surfaces on top of the newly installed graphics kit for additional protection against environmental damage and UV rays from sunlight exposure over time.
Maintenance and Care
To keep vinyl graphics looking their best, it’s important to perform regular maintenance. This includes cleaning the surface with a soft cloth, gentle soap, or cleaner specifically formulated on vinyl decals. Follow manufacturer guidelines, as some products could be abrasive or damaging if used too frequently.
Always check the graphics kit for any signs of damage like peeling, fading, or cracking due to age. If found, the damaged elements should be replaced immediately with a new graphics to ensure all surfaces remain intact. Additionally, waxing the ATV will further protect against UV rays and other environmental factors that might threaten its overall performance.
Choosing a graphic kit for an ATV is an exciting but challenging task. Knowing what type of material best suits certain applications, understanding the exact specifications required, and completing installation procedures properly, will go a long way toward ensuring the happy results desired.
Furthermore, thoroughly researching differences between products offered by different vendors before investing money towards project completion helps save valuable resources (both monetary and physical), ensuring the entire process runs as smoothly as possible. Finally, regular maintenance care should be conducted to maintain the graphics kit’s appearance and original condition over the long term.