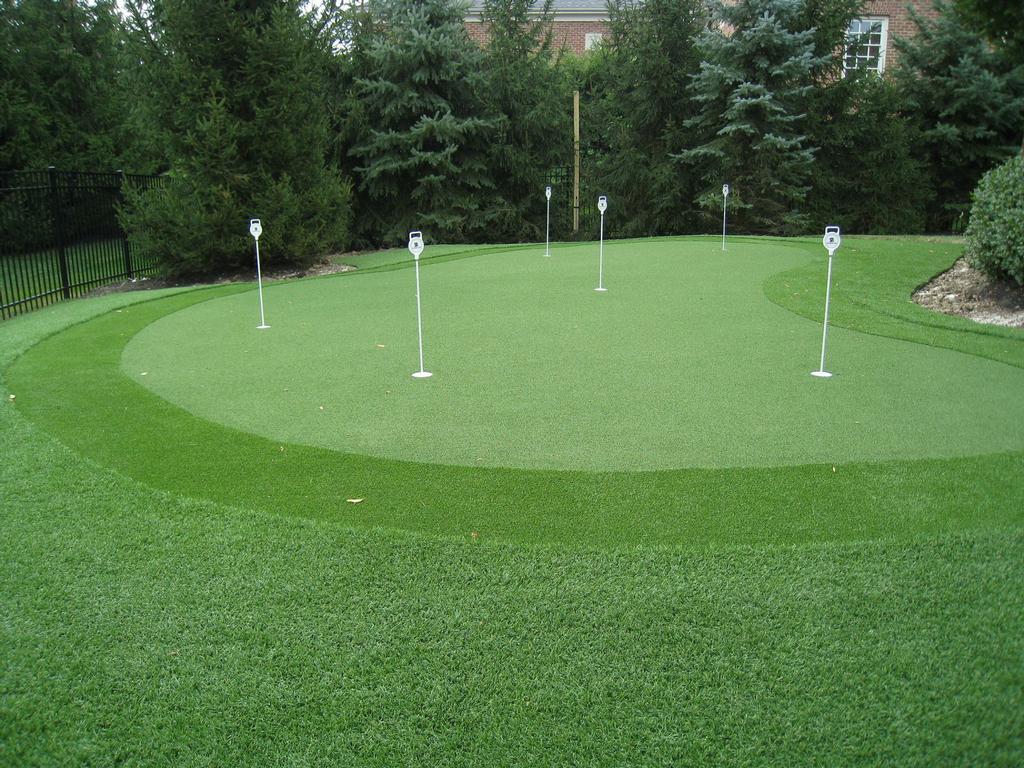
 You can build your own putting green in your garden with just a few easy tips. With your own golf course, you can enjoy a relaxing game or improve your golfing techniques, just because you built it yourself doesn’t mean it won’t look the real deal. Artificial putting greens are becoming bigger and better according to European Golf, and here’s how you can build your own:
1. The first step is to choose the location in your backyard for the putting green. The area should not be too steep. You will need to consider the size of the area that you desire to use for your golfing. Then, you can use a garden hose, string or rope to lay out the shape you want. The design for the putting green can be any shape that will offer you the challenge that you want for improving your golfing skills.
When choosing your design, you will need to keep in mind the width of the turf you plan to use. Some turfs come in rolls that are 12 feet wide. Therefore, measure your area in segments to equal the width of your turf. After laying out your design, you will need to mark the outside perimeter of the design with spray paint.
2. The second step is to remove the sod or grass from the putting area. This can be done with a shovel or sod cutter. After the sod has been removed, you will need to remove any loose debris to make sure that the area is clean and smooth.
The third step is to prepare the ground. The bared area should be compacted down by using a plate compactor. This will ensure that you have a solid foundation. Next, you will want to lay out a weed barrier on the area where the turf will be installed. This barrier will act as a stabilizer for the crushed stone sub base. The barrier will prevent the stones from sinking into the ground.
3. Next, you will need to add a border or edging along the outside perimeter of the designed putting green. The border will help keep the stone material in place when you compact the base.
Place the sub base material evenly over the prepared area. You can work the area with a yard rake to spread the material. The sub base material should be spread flat. You will need to use a shovel to move the larger amounts of the base material around to smooth out the rough areas in the space. The sub base must have a slight slope to allow water drainage. A good rule to follow is to have a one inch drop for about every 10 or 12 feet.
4. The next step is to compact the sub base properly to prevent irregularities in the settling of the putting green surface. Irregularities can affect the way the ball rolls when you are putting. You can rent a plate compactor to compact the sub base properly.
Before using the compactor, you will want to use a garden hose to lightly wet the sub base. Then, compact the area to ensure that you have a good solid ground. You will need to go over the area several times with the compactor to achieve the right compaction. Smooth any bumps, irregular dips or ridges with a shovel to make sure that the area is consistently flat, solid and smooth.
The putting green turf is made to fit snug to the ground surface. Too much slope in your sub base material can cause the ball to roll too fast, which can make the ball roll off of your putting green. To decide if you have the right amount of slope, you can take a golf ball and try putting it on the sub base before installing the turf. Once the turf is installed, it will be much harder to readjust the slope.
[youtube http://www.youtube.com/watch?v=E0li0MXKz6c]
With the area prepared, you are ready to install the cups and turf. Dig a hole about six inches deep. Then, cement the cups in the holes using quick drying cement. Next, roll the turf onto the sub base making sure there are no creases or bubbles. Once you have finished placing the turf, you will need to cut the holes for your cups.